Showing posts with label Container Garden. Show all posts

Thursday, August 1, 2013

Recycled Containers To Plants


Chic Recycled Containers


When it's time to plant your favorite spring flowers, the best containers may be sitting right in your garage. Designer Brian Patrick Flynn used galvanized metal trash cans and added casters and drainage holes to create a modern, portable container garden right on the patio.

Thursday, May 30, 2013

Plant Tower Basics


--Plant Tower Basics--


The Plant Tower is a vertical garden built from four main ingredients. Please know that there is no strict formula or specific materials that you must use to build your tower. I would really encourage everyone to experiment and use what they have available. That being said we build our towers along these lines...

The Exoskeleton/ Frame-
Wire Fencing- 4' tall and 7' in circumference with a 2" by 4" grid spacing. Nylon Deer/ Bird netting is laid and tied on to fencing, fencing is then wrapped into a cylinder with netting on inside.

Straw Shell- A thin layer of straw between frame and soil.
To contain soil, reduce evaporation, and shelter soil from the elements.

The Soil- We use a medley of good garden soil, mixed with compost, and bark chips that will retain moisture and break down slowly.

The Watering Tube- Roughly 2' of 3" Perforated Drain Pipe aka Perf Pipe. Comes pre-perforated with lots of little slits. The tube extends from the top halfway down into the center of the tower. This allows water to penetrate deep into the core of the tower without having to flood the top.

Holes are cut in the side of tower and plant starts are transplanted into the side of the tower.

A full DIY tutorial will be coming soon with details for each ingredient and step of the process.

-TOWER POWER!


Steel fencing-4ft/1.2m tall and at least 7 ft/ 2.13m long. 2’’x4” grid spacing works well. 

3” Perforated Pipe, aka black drain pipe. The tube should be cut to half the height of the tower. 
You can find this pre-perforated at most hardware stores.


The Plant Tower "exoskeleton", made of a cylinder of 2"x 4" grid fencing,
wrapped a finer nylon deer/ bird netting


The first step is layering the straw around the inside edge of the tower. 
Soil is then added, another ring of straw, more soil, another retaining ring of straw, more soil, etc...


The top of this tower with some root crops like radish. Notice the irrigation tube poking up.


ALL PHOTOS AND TEXT CREDIT TO: PLANT TOWERS .....GREAT.

Thursday, April 18, 2013

Coffee Cubes


Freeze leftover coffee in ice cube trays for use later in "iced" coffee recipes.


Photo: Freeze leftover coffee in ice cube trays for use later in "iced" coffee recipes.

I do this but cut the entire coffee mixture in 1/2 and then place 1 coffee
ICE CUBE in my garden --- between plants, mostly my corn for the nitro.

Thursday, March 21, 2013

Wednesday, March 20, 2013

Grow Potatoes in Containers


100 POUNDS OF POTATOES IN YOUR BACK YARD


Container gardening isn’t only for savvy urban gardeners and folks with limited space to grow, it can also be for folks who want to maximize their yields in a controlled environment. Not only does growing potatoes in a barrel reduce the amount of weeding and exposure to pests and fungi, you don’t even have to risk shovel-damage to the tender potatoes by digging them out of the ground when they’re done, just tip the container over!
After extensive research to plan his own potatoes-in-a-barrel, Tim fromGreenupgrader.com boiled all of the recommendations down to 4 simple steps to a winning potato harvest.

1. Select and prepare a container

You’ll need to pick out a container such as a 50-gallon trash barrel or one of those half whiskey barrel planters. Alternatively, you can buy used food-grade barrels or commercially-available potato planters. Just about any 2 to 3-foot tall container will work, but be sure to select a container that either already has holes in it, or is okay to cut holes in. Next you’ll want to clean your container with a mild bleach solution to get out any of the nasties that have been lingering in there.
Good drainage is critical for the cultivation of healthy potatoes so you’ll want to cut or drill a series of large drainage holes in the bottom and bottom sides of your container. Alternatively, you can cut out the bottom altogether and place it on a well-drained surface like your garden bed.
seed-potatoes

2. Choose a variety and plant potatoes

Seed potatoes can usually be found at nurseries early in the growing season, but you should only have to buy them once. If you can, “chit” or sprout your potatoes before planting them by setting them out in an egg carton, the side with the most buds facing up, and putting them in a cool light room out of direct sunlight to sprout. Putting the tubers in an open paper bag can have this same effect.
Fill in the bottom of your container with about 6 inches of loose planting mix and compost. You’ll want to use a planting mix with a peat moss-like soil amendment like this product made from repurposed coconut husks, doing so will keep the soil from becoming too compacted and help it to store moisture for the roots. Next, add some seed potatoes on the layer of soil, making certain to leave plenty of space between each cube. You can use the whole potato but I like to cut the potatoes into 1 to 2-inch cubes for planting. Loosely backfill the potatoes with another 6 inches of your soil and compost mix and water to dampen soil. Keep the soil damp at all times but be careful not to overwater.

3. Add more soil

When they have about 6 to 8 inches of foliage, add another layer of your soil-compost mix covering about one-half to three-quarters of the visible stems and foliage. Repeat this process of allowing the sprouts to grow and then covering the sprouts and moistening the soil as the plants grow up toward the top of the barrel.

Barrel potatoes

4. Harvest the potatoes

After about 10 weeks or until the plants flower and start to yellow, the potatoes should be ready to harvest. Carefully dig down with your hands to inspect the top-most layer. After you’ve confirmed your suspicions, dump the barrel out on a tarp and inspect your bounty.

Other tips to grow bushels of barrel potatoes

  • After the first harvest, keep a few potatoes to use as seed potatoes next year.
  • Bush beans are a great companion plant for potatoes.
  • Instead of using soil, try growing potatoes in sawdust..
  • Experiment with different containers, seed potatoes and watering regimes.
  • Have any photos or useful tips for growing potatoes in a barrel? Please share!
http://mattovermatter.com/2011/07/how-to-grow-100-pounds-of-potatoes-in-4-steps/

Wednesday, March 13, 2013

Bananas N Egg Shells N Garden

 Bananas N Egg Shells N Garden

*Clean dry egg shells
*DRY banana skins
* 2 TBSP baking soda
*1/3 cup USED coffee grounds
Grind together in food processor.

Use as:
- mulch
-top soil
- a large batch and put in empty #10 can
-1 teaspoon full of dry mix into water can for garden 

-seal and use all season long
-mix into compost
-sprinkle on garden after first snow, let it soak in during winter!

Dry banana peels between two window screens laying out in sun.
Vent them by placing them on cinder blocks.
Bring them in at night to avoid moisture.
Tear to thin strips - dry quicker.
Place on black garbage cans - for quicker drying. 


You need approximately 5 pounds of dried banana peels for every 100 square feet of soil to see benefits in plants.


 How to Dry Banana Peels for Fertilizer thumbnail

Tea Bag In Garden

Tea Bags In Garden


~ Used tea bags ? Garden loves them.
*Bury them in the soil
*Tear them opened and sprinkle the tea all over the soil
*Put them in compost pile
*Many use them in their worm boxes too, I'm just starting worm box - so I'll let you know how that goes.


Tuesday, March 12, 2013

Coffee And Grounds In Garden


Coffee And Grounds In Garden


 Folgers Classic Roast Coffee Canister
  photo from Folgers site. THANKS Folgers......my plants LOVE YOU.
*I don't drink coffee . I buy it at lowest price . NO flavored coffee, NO decaf.
*Plants love coffee.
*I make coffee (outside it gives my spouse asthma attacks).
*1 cup coffee - cool
*4 cups water
*Dump all around garden, never on the roots. If you are going to put on the roots use 5 cups water.

~~Coffee Grounds -
*I take them to my corn mostly ~ but I do bury some in each area of garden.
*1/3 cup coffee grounds mixed in 4 NEW cups of soil sprinkled on top of soil.

COMPOST
* I use coffee grounds from friends too ~ they go to my compost.


Crushed Egg Shells In Your Garden

Crushed Egg Shells ALL Over Your Garden...


*Crush your egg shells.
*Put them in your soil.
*When you crack an egg to fry / scramble rinse them.
*If you hard boil eggs KEEP the water - cool and use water in garden..
*I tuck them away in my soil, everywhere - all over my garden, in my garden containers -from March - the first snow (October).
*Remember DO rinse them out. The bugs love them if you don't and you DO NOT want bag bugs moving into your garden spaces.
*Keep your eggs from winter, rinse, dry & keep in a zip plastic bag.


Water Your Plants When Not At Home Cheaper


Water Your Plants When Not At Home Cheaper


Water Your Plants When You're Away


Place the other end of the string into the water bottle.
 A little improvement - tread the exposed string into straws to lower evaporation into the air.

Maybe elevate the water source higher than the plant, moist seeks lower level due to gravity.
(HomeMadeIsEasyblogger)

 http://snapguide.com/guides/water-your-plants-when-youre-away/
 The water will wick its way up the string and into the soil, keeping your plant watered while you're on vacation.


Garden Tower Project Best Idea

THIS IS THE BEST I HAVE EVER SEEN.
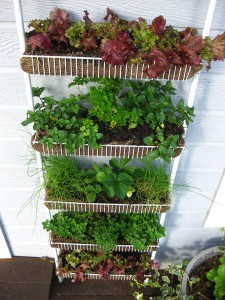
The middle has red worms to make "worm dropping tea".
THIS is the way to go.
Tip my hat to this site and bless them for sharing all their data!


gardentowerproject    
Please visit this site for even more data.
Photo: Garden Tower Project 

http://thehomesteadsurvival.com/garden-tower-project/#.UTqrwFc72Sk

Initial set-up and planting:
 
Add a soil mixture (6-7 cubic feet) that is organic if possible.  Very light and lofty mixes are available that will do a great job while only adding 20-30 pounds of weight (dry). 
 
Remove a handful of soil from the pocket to be planted (when planting starts).  Plants can be grown from seed in the Garden Tower as well, but special care must be taken to maintain moisture in each pocket without disturbing the seed and soil (frequent bottle misting is an effective method).
 
Garden Tower setup
 
Straighten bound plant roots and insert starter plant into pocket. 
 
Garden Tower setup
 
Replace removed handful of soil and use it to support the new plant.
 
Garden Tower setup
 
Lightly press soil around the plant stem to bolster root zone and prevent soil loss during watering. 
 
Garden Tower setup
 
Gently water each pocket 1-2x daily for 7 days or until plants develop new roots and appear stable.
 
Garden Tower setup
 
Watering from the top is all that is necessary beyond the first week.  Adding some mulch, leaf littler, coir, or other fibrous material to the top surface will help reduced evaporation and prevent soil disturbance making watering even easier. 
 
Garden Tower setup
 
Add 2 or more pounds of compostable kitchen scraps to the compost tube prior to adding worms.  We suggest adding your worms after you have been adding kitchen scraps for at least 3 days, this provides time for decay which is necessary for the worms to feed.  Adding some shredded cardboard or newspaper periodically (1 part paper to 4 parts kitchen scraps) will help provide the carbon:nutrient balance for the worm community to thrive.
 
 Garden Tower setup
 
Add 2 to 6 ounces or about one cup of healthy worms.  Red wigglers and nightcrawlers will work in companion to maximize productivity and nutrient cycling in the Garden Tower.  Red wigglers and nightcrawlers can be found locally at very low cost in most communities (outdoor sporting stores, bait shops).  However, numerous online outfits will deliver healthy worms to your door. 
 
Garden Tower setup
 
The planted Garden Tower after one week!
 
Garden Tower setup


The planted Garden Tower after exactly 14 days!
 
 
Garden Tower Willie Streeter


img_0447web
 

50 Plants + Composting in Four Square Feet!

The Garden Tower grows plants vertically, enabling you to grow 50 plants in a very small space -- the ultimate square foot garden with integrated composting! Most container gardens only allow planting on the top. The Garden Tower has 45 openings around the outside and space for up to 5 taller plants on top, resulting in an impressively bountiful harvest.  Along with the top, side planting pockets are large enough to accommodate compact root vegetables such as turnips, carrots, and radishes.
 
img_0447web  


Garden Tower Willie Streeter 
  
    
Garden Tower Willie Streeter


Garden Tower Vegetable Broccoli


Bloomingfoods East Garden Tower
 
Garden Tower Youth Food Program 
 
Garden Tower 
 
Garden Tower Bloomington Community Garden


Fall Tomato harvest from a single large tomato plant in the top of a Garden Tower at Hilltop Gardens Nursery
 

Container Garden Helps


Container Garden

Peas Zucchini Green Beans Tomatoes

My Container Garden (had 50) 2012


The HOA refused my request to put garden and remove grass. SO I planeted container garden for front yard. NO they were not happy, but it's not against rules!

Perfect planting area for herbs (patial sun) in front yard ----but any type of   "food" is banned from front yards by HOA rules. 
The #10 cans in the post are two-fold helps.
1. Hold young plants up against wind
2. Bring in electric from air every plant here has a "can" around it.
This garden is from May 2012.
I plant inside in March, April then put outside when frost is gone.
This garden kept us in fresh veggies until late October when frost hit.
I did take plants inside but cat & dogs helped themselves so they were happy & healthy but we didn't get more from the plants ourselves.

Friday, March 1, 2013

Container Greenhouse Gardening

I like this idea. I would vent it more & keep a close watch on this so it doesn't burn your plants. I did do this a few summers ago with seeing the photos and I enjoyed my results. NOW you have photos to use & DO.


photo credit: Homesteading Ways


Photo Credit: Homesteading Ways. Please Give Credit If YOU COPY.