Showing posts with label Garden Seed Starter. Show all posts

Saturday, March 23, 2013

Carton Seeding Starting

Photo: Carton planters

~More Re-purposing: http://on.fb.me/SGtQpa

JUICE, SOY, MILK containers are GREAT for starting seedlings.

Starting Seeds For Garden


Soil Blocks for Seed Startingposted on 2/20/2013


https://www.pick-a-pepper.com/members.php#editpanel


Here is what you need to get started:
Soil (see recipe below)
Block maker.  You can make this easily with a few tools, and household items (directions below).
Something to hold your soil blocks in. These could be anything from shallow wooden crates, those clear plastic boxes that lettuce comes in, seed flats, or whatever else works.

Making the Block Maker:
You need: 
For most projects a small yogurt cup and lid will work great. This will be used to make the actual block. Other mold materials could be PVC pipe, or other containers.
8 inch eye bolt, 3/8 inch wide.
2 bolts, each 3/8 inch.  
2 washers
Drill with 3/8 inch bit.
Hacksaw

To make the blocker:
With a hacksaw cut the bottom off of your yogurt container about 1/4 inch from the bottom. The part that you cut off will become the "plunger" that pushes the soil block out of the mold.

Seed Block Soil Recipe (from VelaCreations):
Eliot Coleman's Organic Recipe
30 units peat
1/8 unit lime or ½ unit wood ashes, 
20 units coarse sand or perlite
3/4 unit organic fertilizer (equal parts blood meal, colloidal phosphate and greensand)
10 units good garden soil
20 units well-aged compost

Sift all ingredients before mixing.  Mix the peat and lime or wood ash first. Mix the sand or perlite with the fertilizer.  Then mix everything together.
You can also use a commercial seed starter.
Thoroughly wet the soil mixture before getting started with making the blocks.  You want it to be nice and wet so that the it will easily mold into the blocker and be released into the appropriate shape.  Think-sandcastles.
Jab the block mold (yogurt container) into the wet soil mixture.
Place the filled mold over the spot you want to release it (tray, crate, or whatever).
Use the "plunger" and push the soil out of the mold, into place.
Place the soil blocks fairly close together, about 1/4 inch or so.  
Place a seed or two in each center depression and cover with soil.
Water gently with a fine mist so that you don't flood the blocks and flatten them.  
 

Thursday, March 21, 2013

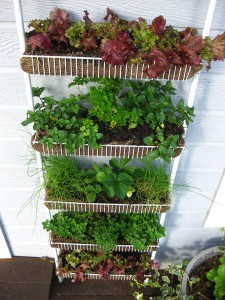
Kitchen Door Rack UPCYCLED

Kitchen Door Rack ~ Turned into outdoor Spice GARDEN

Burlap with soil & plants

Instant HERB garden ~


asuburbanfarmer.

Yogurt Container Seed Starters

Easy Seed Planting Yogurt Containers

Good drainage is essential.

yogurt container


Plastic wrap ensures a constant moisture level.

plastic wrap keeps moisture in ~ but watch for mold ~ bacteria growth.
YOU don't have to use the wrap

If more water is needed, let it wick up from the bottom.

Make sure you  post what each plant is
you can also use Popsicle sticks ~ but use
permanent laundry marker (water will make stick wet)
~do NOT spray paint anything for your garden use ~ poisons


http://www.finegardening.com/  PHOTO CREDITS