Showing posts with label Survival. Show all posts

Thursday, April 4, 2013

Storage Non-Food Items


These are just some of the non-food items that I have in my storage:

WE all have our own list. by:HOMEMADE IS EASY blogger~Virginia
antibiotic creams
bandaids
books on local plants
books for entertainment
can opener (non-electric)
candles, of all size
*100 hour candle-store bought* must have ventilation to use this product
canning jars
canning lids (for bottling meats)
cough drops
deodorant (men & women)
dish soap
documents (copies of birth certificates, car/home ownership papers, etc)
duct tape, electrical tape
eucerin cream
Excedrin
face creams/hand creams
games (for all ages & we use board games--no batteries required)
garbage bags
gloves (leather work, garden & dish gloves)
hats (broad to protect from sun)
hydrogen peroxide
matches
medications you may need
muscle rub
paper/pencils
paper or Styrofoam cups/plates/bowls
paper towels
paper for writing
pencils & ink pens
pepto bismol
plastic utensils
portable toilet/garbage bags-----see my blog for my project
razors
rubbing alcohol
scriptures *Bible* in sealed bucket w/ documents for emergencies *Family Bible is in living room!
sewing needles/threads
shampoo/cream rinse-----see my blog for recipes
shoes (sturdy walking/working shoes)
soap (bar, dish and laundry) ----see my blog for recipes
sun screen
toilet paper (average of 1 roll per person for every 4 days)
tooth brush/paste/floss
Tylenol & Tylenol pm
Vaseline
vics vaporub (rub it on the bottom of your feet & cover with socks to stop a cough)
vics sticks for nose

Friday, March 22, 2013

Thursday, March 21, 2013

Checklist for Disaster & Emergency Survival


EXCELLENT ARTICLE. Site Included.


Disaster Planning Checklist, BE PREPARED!


Disaster Survival Planning Checklist,
Emergency Preparedness Checklist,
Disaster Planning Checklist, and
Disaster Survival Checklist, v32

Your planning should see your family through a minimum of fourteen days of survival.Fourteen days will statistically see your family through 96% of known disaster emergency situations. Seven days will only get you through 50% of known disaster situation. Consider more than fourteen days of survival for locally known situations where your area can be physically cut off from resupply for very long durations (seismic areas, land/snow/mud slide areas, below sea level areas, flood planes, low lying island areas and areas of difficult or single method access, for example by bridge, single road, boat, plane, trail, or by horse/mule access only). The 2004 Florida Hurricanes had some home areas without power for up to 22 days, but the area residents had access to vehicles and could travel to other towns for supplies. New Orleans' Hurricane Katrina demonstrated the good and the bad for planning and preparation. 

After the initial creation of this checklist, the Lowe's Severe Weather / Natural Disaster Readiness Guide and theAmerican Red Cross web page guides were used as references for content validation. By the way, this site holds up very well, perhaps presenting the most items and situational concerns, however, two issues exposed themselves over time: 1) There were, at one time, hypertext links to the Red Cross and Lowe's Emergency Planning Web Pages embedded in this checklist/web page, however both organizations kept changing their web page locations and names (URL's), so we stopped trying to track their shifting Web Site page URL's - their web pages are still good sources for information. 2) While the other sites list nearly the same checklist items, our site addresses big view issues and little situational issues and solutions that other sites don't write about.

As for personal experience: Dennis has been in several Hurricanes, a few Typhoons, Floods, Earthquakes, a Wild Fire, many Blizzards, and unknowingly survived driving near the edge of a Tornado during a dark and rainy night on a motorcycle (the same tornado that broke the back of Dennis' US Army Flight School Class Leader, Larry Rose, and destroyed three helicopters on the flight line). Dennis has also performed a few search and rescues (or recoveries) by Helicopter.
Some common events that result from natural disasters are:
1. Varying degrees of property loss/destruction:
   - Loss of shelter (from slight to complete)
   - Loss of land, vegetation, and/or resources
   - Loss of protection from weather, heat, environment 
     (infection, diseases)
   - Loss of Physical Security (human, creepy crawlers, and predators)
2. Loss of clean water:
   - No drinking
   - No bathing/shower
   - No flushing
   - No water for water heater
   - No water for sanitizing
   - No hot water
   - No water for cleaning
   - And maybe no water at all
3. Loss of food:
   - Access
   - Supply Contamination
   - Spoilage
4. Loss of medical care and sanitation capabilities.
5. Loss of power source (electrical, fuel, steam, natural gas):
   - Loss of light
   - Loss of heat 
   - Loss of cooling
   - Loss of ALL appliances
6. Loss of communication:
   - Loss of telephone (cell and cellular phones too)
   - Loss of TV
   - Loss of radio (transmit or receive signal) 
   - Loss of satellite (wind, cloud, lightning, power
     signal conversion, reception, or battery loss).
Disaster Planning Checklist, BE PREPARED!The idea behind natural disaster preparation is to "Be Prepared" for:
  • Utility Loss
  • Service Loss
  • Mobility Loss
  • Convenience Loss
  • Degrees of Property Damage and/or Loss

  • Residents of remote areas already know (or should know) that restoration will take longer, therefore some checklist items, like food, require a larger reserve inventory than in other areas.

    The following checklist is generalized for surviving known natural disaster types. Specific types of disasters will require specific types of active preparation. For example, in an area known for flooding, one should consider having a one way sewage valve that prevents sewage from reversing direction when the water treatment facility has a higher water/flood level than a residence. The Red Cross and some government agencies have further details about specific Natural Disaster Readiness. Again, our apologies for not having hyper links but the Red Cross keeps changing its web page name or location.

    Disaster Survival Planning Checklist,
    Emergency Preparedness Checklist:

    --------------------------------------------------------------
             Prior Plans, Arrangements, and Actions
    --------------------------------------------------------------
    [ ] Short-Term and Long-Term plan for inadvertent separation,
        Escape route plan and alternate plans for:
    [ ]   House Escape (e.g., meet at corner, church, school, ...)
    [ ]   Location Escape (e.g., meet at uncle's house in X City)
    [ ] Address and Phone Numbers:
    [ ]   Pre Store:  - A List/Photocopy of Important Numbers
    [ ]                 In a waterproof protector/container
    [ ]               - Last year's Telephone Book 
    [ ]   Make Handy and At Last Moment, Store: 
    [ ]               - Personal/Family Address Book or List 
    [ ]               - Current Local Telephone Book
    [ ]               - Insurance Agent(s)
    [ ]               - Insurance Company(ies)
    [ ]               - Policy(ies) in known safe place
    [ ] Important Home Documents (Kept in sealed water proof 
        box/containers/document-holders, which in turn are stored
        inside a fireproof safe, gun safe, or fireproof file cabinet): 
          Check Books, Birth Certificates,  Pass Ports, Visas, 
          Mortgages, Loans, Ownership, Cash, other small valuables
    [ ] Computer backup system that is restorable -
        Computer/Data Information Disaster Recover Plan
    [ ] Emergency Cash.  There is often a time frame when cash is
        unavailable, even if you have money in the bank and a dozen
        credit cards. When money systems are temporarily not 
        working, cash can become a scarce and valuable commodity.
    --------------------------------------------------------------
                        Items and Issues
    --------------------------------------------------------------
    [ ] Large Plastic Trash Can(s), with Wheels and Cover
        used to store the Disaster Supplies,
        40 to 55 Gallon, No holes (leak proof / floatable).
        - If New and Clean, It may be lined and filled with water.
        - It is difficult to get liners larger than 55 gallon
          size (found in hardware stores) - Meaning that larger
          containers loose any water storage benefit.
    [ ] Plastic Sheeting (NOT the super thin cheap stuff,
        big roles (found in paint supplies), 75 yards
    [ ] Duct Tape, 150-175 yards (NOT masking tape)
    [ ] Flashlight(s) and Batteries, Tested and Working.
        Observation 1: All family members feel tremendously more 
        secure if they have their own flashlight, even if its 
        an LCD light for a two year old. 
        Observation 2: Lately the expensive self contained 
        perpetual electric generation by motion or crank lights 
        seem to be worth consideration. There appear to be two
        versions, as some have very dull lighting and some are
        very bright - test before purchasing. Know the 
        usage instructions.
    [ ] Matches/Lighter, Dry, with reserve Fuel, Water Proof 
        Container. Usually when these are needed there is 100% 
        humidity, everything is wet, and the wind is blowing. 
        Wind Proof Butane lighters work well below 7,000 Feet 
        Altitude. Magnesium Strikers work all the time, 
        anywhere (not cheap, makes ignition spark, not flame). 
        Matches and Waterproof Matches are less reliable in 
        bad weather conditions. A mix is best.
    [ ] Oil burning Lamps/Lanterns. Extra oil, maybe a few spare wicks
        and/or glass bulbs. Oil wicks dry out and any un-used oil in the 
        lantern base will evaporate over time. Wicks may need to be 
        re-primed with a little oil - be careful, there is a reason
        that oil lamps are not used much any more - any oil-lamp
        mismanagement is a fire hazard.
        Warning: Do NOT leave kids, animals, or mentally 
        challenged people around burning lamps.
        Warning: Do NOT leave lamps on table cloths or 
        similar conveyances as they may be pulled off and start 
        a fire too easily.
    [ ] Fire Extinguishers, quantity 2 x 10-20 Pound, 
        ABC Type Rating (only and always)
    [ ] Candles, Many, Long Burn Time is Best. Learn to save 
        all candles accumulated over time in a candle (shoe) box.
        Warning: There are times when using candles/oil lamps
        is a safety hazard (presence of: natural gas, dust/small 
        particles, chemical agents, anything that can burn
        or explode; also kids, pets, and wind or loose materials
        create additional safety issues). 
        Warning: Do NOT leave candles unattended and 
        their benefit is for after the disaster,
        NOT during the disaster.
    [ ] Batteries for all existing battery operated equipment
        (Look through this list for any reminders)
    [ ] First Aid Kit, See First Aid (Group/Family) Kit
        Communication Considerations - Make reasonable choices:
    [ ]   Device Batteries and Spares, Fully Charged,
    [ ]   Gather the Battery Charging Units (House and Automobile)
          Note:-Sometimes people live off generator and automobile
                charged battery systems for weeks.
               -Sometimes the generator is located at a friends,
                church, business establishment.
          Two Way Communication Units:
    [ ]     Cell Phone, Satellite Phone
    [ ]     CB Radio and or base station (system)
    [ ]     CB/2 Meter/Ham Transmitter (Requires Power System, 
            Antenna System, and prior knowledge/training/and 
            a License to operate) This may be a neighbor. 
            Don't forget the Internet (when available).
          One Way Communication Units:
    [ ]     AM/FM portable radio, Short Wave Receiver      
    [ ]     Radio (batery operated, also with AC is better) 
            with shortwave reception is best, digital and analog 
    [ ]     TV (batery operated, also with AC is better) 
            analog and digital signal capable
    [ ] Insect Repellent:
    [ ]   DEET
          Permethrin (requires wash or spray application to clothing prior to use,
             not for human skin application, it is for Clothing ONLY, 
             will kill cats but not dogs, for example if cats
             lie on a shirt or coat that was dipped in a
             Permethrin solution
        Water & Container considerations:
    [ ]   Fill Tubs (Most likely used for cleanup,
           but can be treated and drank. Assumes clean 
           environment to start and water boiled for 5 minutes
           and/or chemical treated [Read treatment instructions. 
           If Clorox, non scented and non soapy, 
           one drop per liter/quart or five drops per gallon, 
           mix and let set for at least five minutes]). 
           All water treatment requires boiling.
    [ ]   Bottled Water: 
          - Refill sanitized bottles (grape, apple, water) over time.
          - Buy bottled water by the case (plastic or glass).
            Consider bottled/canned non refrigerated Juices too.
    [ ]   Best: Large Construction Site Plastic Water Jugs
           with a side tap (not cheap, at least one, 
           20 to 30 gallon. Fill it where it will be stored 
           by hose, pitcher, or water cans.
    [ ]   Plastic Water Bladders, Water Cans (3 to 5 gallon, 
           Many, Plan One Gallon per Person per Day minimum, 
           more if working or other known local situation)
    [ ] Sustenance (NON Refrigerated):
          Canned:
    [ ]     Stew, Beans, Meat, Fish, Peanut Butter, Other Protein
    [ ]     Vegetables
    [ ]     Milk
    [ ]     Soup
    [ ]     Juice
    [ ]     Survival or Camping Prepackaged Meals
            Caution: Most Prepackaged Meals Require Water
          Plastic:
    [ ]     Gatorade (powder or liquid form)
            Caution: Powdered mixes require water.
        Fuel:
    [ ]  Vehicle(s) topped off, and Road Ready. Consider
          Evacuation, where/when appropriate. 
          See Vehicle & Travel Checklists
    [ ]  Plastic Fuel Containers, Appropriate, Correct Fuel Type,
          Safely Stored. Fuel can be a hazard if not 
          properly protected, mostly used for your generator)
          (Metal cans rust, full cans prevent water condensation)
    [ ]  Propane Fuel Bottle(s), Full
    [ ]  Optional: Fuel Hose or Fuel Siphoning System
          Warning: Don't get yourself into a situation 
          where you may be considered to be a looter, 
          know your neighbors, work with friends
    [ ] Generator, Topped off with Gasoline and Oil.
          Trade off exists between Size (Watts) and Fuel Use.
          Generally, the bigger the better, bigger units use 
          more fuel. Best Case: 1800 Watt and a 5000 Watt.
          5000W stays stationary, 1800W ported for tool use.
          Not to be used in a home or enclosed space, 
          Read the operators manual, know appliance Watt ratings. 
          DO NOT Connect to the house current, plug appliance
          into extension cord.  
        Note: Propane Generators also exist but are
          only worth consideration if you have access to a 
          very large propane fuel reserve source.
    [ ] Extension Cords: 50 Ft, Heavy Duty, 4 to 8 count
    [ ] Stove/Grill: White Gas, Propane, and/or Charcoal, 
          Camping type.  Propane seems more utilitous with 
          10 and 20 pound bottles (which can be used for other
          items). The system is most utilitous if it can also 
          function from the 1 pound bottles (which are commonly
          sold in "sporting goods" departments or stores).
        Caution Keep bottles current as they expire by 
          law (propane suppliers/dealers know the requirements).
    [ ] Propane Lantern that can run from the same fuel tank 
          as stove cooking system and/or from little one pound
          fuel bottles. Use a "tree or gang" hose outlet 
          (mantels, wrench, hoses). See Propane (Cook Station) details.
    [ ] Refrigeration/Cooler/Ice (mix solutions if possible):
          - Pre set all refrigerators or freezers to coldest setting.
          - Open as little as possible.
    [ ]  Mini Electric or Propane Operated Refrigerator,
          Combination Electric and Propane is best.
    [ ]  Cooler(s): Bigger is better, more than one if possible
          (coolers usually can float, if necessary)
    [ ]  Ice: If you have a freezer, use the freezer as a cooler.
          Pre-Freeze blocks of ice in plastic bags and/or buy
          (Ice can be a very valuable commodity)
    [ ] Bow Saws: One 3-4 Foot Blade, One 2 Foot Blade,
          Spare Blades.
    [ ] Face Masks, Disposable
    [ ] Trash Bags (2 boxes Kitchen size, and 1 box/roll 
          of Lawn/55 Gallon Drum sized)
    [ ] Zip Lock type Plastic Baggies (Gallon and Quart)
    [ ] Safety Goggles or Safety Eye Shield(s)
    [ ] Plastic Buckets (5 gallon size, 3-5 count)
    [ ] Sponges, Big (size of 2 fists of 1 big male, 3-5 count)
    [ ] Bleach (pure bleach, NOT the color fast stuff),
          used for sanitizing.
    [ ] Towels (Lots of Paper and Cloth)
    [ ] Knives (HD Swiss Type & HD Survival Type)
    [ ] Baby Needs
    [ ] Baby Wipes / Handy Wipes, These are very utilitous for 
          individual cleanup (like a bath in a box)
    [ ] Kids Fear Note: When I was a small kid, I don't ever remember 
          being scared of a natural disaster in the making. I can remember
          the family being huddled up together and sort of camping in the
          basement or living area.  What this really means is that my 
          parent(s) were acting calm and collected!
    [ ] Kids:
    [ ]   Coloring Books/Paper, Crayons
    [ ]   Reading Books (parents too)
    [ ]   Paper, Pencils, Color Pencils
    [ ]   Little Job Responsibilities (putting pictures in 
          albums, Memorizing the States/Capitols/Presidents.
    [ ] Can Opener, Manual (Knives and P38's get old in a hurry)
    [ ] Camera, working, with Film (Disposable Camera can be stored)
          Take pictures of the immediate after disaster effects
          before restoration/clean up work begins, especially 
          for Insurance purposes.
    [ ] Soap (bar and dish liquid). Personal Hygiene is Very 
          Important. Soap is the #1 Bacteria Killer. It
          usually only takes three days for anciently known 
          germs and diseases to make an appearance somewhere.
    [ ] Disinfectant
    [ ] Toiletry Kit(s): See Toiletry
    [ ]   Including Sewing Kit
    [ ] Work Gloves, Enough for Family and Friends (wink)
        Clothing:
    [ ]   Good Heavy Duty Work Clothes, Changes of Clothing  
    [ ]   Undies and Good Work Socks
    [ ]   Heavy Duty Boots
    [ ]   Wide brim hat(s)
    [ ] Eating Ware (the idea is sanitation disposability 
         in an area where water is not readily available, 
         otherwise use your regular eating ware):
    [ ]   Paper Plates
    [ ]   Paper Cups
    [ ]   Plastic Eating Ware / Cutlery
          Review Basic Foods and/or 
          Cooking Ware
    [ ] Aluminum Foil, Heavy Duty, Wide (quite utilitous)   
    [ ] Medications: It is wise to have a list and schedule
          of medications for each person.  Some Meds require
          special cooling or handling. 
    [ ]   Use plastic bags and mark them as needed
    [ ] Paper and Pencils 
    [ ] Water Proof Markers, Lots
    [ ] Toilet Paper, Lots
    [ ] Paper Towels, Lots
    [ ] Pet Food and Water Considerations
        Camping Equipment (See Camping as reminder):
    [ ]   Tent and associated gear
    [ ]   Sleeping Bags
    [ ]   Stove, Working with all Pieces present, Fuel
    [ ]   Blankets / Space Blankets
    [ ]   Matress/Pads
    [ ] Chain Saw, Spare Chains, Oil, Lube Grease, Keys/Wrenches, Spark Plug,
        Gasoline (in container). See Chain Saw
    [ ] Axe(s)
    [ ] Cordless Drills (charged, spare battery), 
          Drill Bits, Screw Bits (+ & -), Hex Bits,
          (Torx bits if needed)
    [ ] Screws: Assortment (boxes) of Phillips (+) Round Head
          size 8, 10, & 12 at lengths of 1, 1.5, 2, 3, 
          and a few 4 inches.
    [ ] Hammer, Nails (boxes of flat heads, 1, 2, 3, and 4 inch)
    [ ] Wrenches, Large, Medium, and Small 
          (for 1/4 inch to 3 inch nuts)
    [ ] Pliers (Large & Medium)
    [ ] Scissors, Big (Box Cutter in a pinch)
        Levers (Heavy Duty blown down work - AVOID Electrical Lines):
    [ ]   Crow Bar, Long (3 foot)
    [ ]   6 foot long, 2 inch wide steel pipe 
    [ ]   Wood 6 foot 2x4 or 4x4 inch post, no knots
          (does not conduct electricity or transmit heat)
        Ladders (AVOID power lines! - Read Safety Instructions):
    [ ]   6 Foot Step Ladder
    [ ]   24-34 Foot Extension Ladder
        Wood: 
    [ ]   Minimum of 8 to a bundle: 8 foot long knot free 2x4's, 
    [ ]   Minimum of 2: 4x8 foot sheets, 3/8 inch thick
    [ ]   Other lumber as needed/desired
    [ ] Nylon Rope and Tow straps, for Dragging and other Heavy 
        Duty work, (Strength measured in Tons, not Pounds)
        Shovels: 
    [ ]   1 Long Flat Blade
    [ ]   1 Long Spade (pointed) Blade
    [ ]   1 Snow Shovel (with a long tine rake, works surprisingly 
                         well for muddy and wind blown debris.
                         Like a huge dust pan!)
    [ ] Mops, Brooms
        Rakes:
          1 Metal (Heavy Duty)
          1 Long Tine (Plastic or Metal)
    [ ] Cleaning supplies (buckets, soap, sponges, towels, 
          Heavy Duty Rubber or Latex Gloves)
    [ ] Wet/Dry Vac
    [ ] Wheelbarrow, Big, Working, Airless Tires best for this
          situation.  If pneumatic front Tire, then fill with 
          correct air pressure. Tire Pump, Flat Tire Repair Kit, Tube
    [ ]
    
    --------------------------------------------------------------
                       Other Considerations
    --------------------------------------------------------------
    [ ] The second most common disaster regret (after life 
          and death issues) is the loss of Pictures and 
          Photo Albums. Consider a storage/relocation plan.
          This is a good responsibility for kids.
    [ ] Neighbor/Family Check/Support/Report System
    [ ] Livestock Safety
    [ ] Pet ID, vaccination, photos, papers, carrier,
          Keep close for evacuation
    [ ] Consider investing in a total propane backup system
          (4+ propane bottles [20 pound], stove, lamp, 
          mini refrigerator [about .5 bottle used per day
          with mini-refrigerator])
    [ ] House Standby Generator
    [ ] Pipe Heaters, Wood Burning Stove, HD Hair Dryers
    [ ] People Shelter - Safe Area Creation/Designation 
          and Reinforcement
    [ ] Safe Fire Clearing Around House (including 
          firewood storage way away from house or 
          building), ability to seal up a house, 
          Fireproof a house
    [ ] Waterproof a house, Earth dam walls, 
          Dwelling Elevation.
    [ ] Sand Bags (a temporary solution), 
          Landscaping (a permanent solution)
    [ ] Water Purifier. Hand operated, expedition type,
          Typically available through better camping
          supply stores, read instructions, have extra
          filter cartridges.
    [ ] Windproof/Stormproof a house (pre made window
          coverings with fast connect/disconnect bolt
          system)
    [ ] Emergency fire fighting system (small trailer 
          with water tank, generator, pump, hose
          fire suppressant chemical <- they work!!!)
    [ ] Big Fans
    [ ] One way sewage flow valve
    [ ] Plan for gathering and storing loose
          outdoor/lawn items - a good responsibility for kids.
    [ ] Document Storage (Waterproof/Fireproof containers,
          Complete Offsite Way Away Remote Digital Storage)
    [ ] Plan for shutting down utilities, quickly
    [ ] Earthquake Proofing (lots to do here, research online)
          Also see Earthquake Survival, the Next Checklist.
    [ ] Spare Circuit Breakers
        Alternate Transportation:
    [ ]   Bicycles, See Bicycle
    [ ]   Small Boat, Canoe, Inflatable Raft 
          with oars/paddles & gear. See Boat
    [ ]   ATV, See ATV
    [ ]   Snow Mobile (Slang: Sled)
    [ ] Various Sized, Stackable, Sealable Plastic Storage Boxes
    [ ] 
    
    Comment: During the 2004 Florida Hurricane Season, guys and gals with chain saws were public hero's and Movie Theaters were a place to escape the heat (even if a movie was watched for the umpteenth time). A lot of Theater owners lowered the price of admission. People with working toilets were popular and toilet paper was more valuable than cigarettes in a prison. 
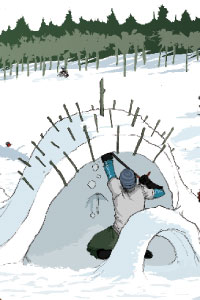
    Pop Top Fishing Hooks


    Pop Can Fishing Hooks

    Photo: Here is a way to go if you do not have any hooks. A from an aluminum can and a few modifications and you are that much closer to having food.

    Pencil Sharpener for Survival


    Broken Cell Phone Use The Parts In Survival


    Surviving the Coming Apocalypse With Your Smartphone

    Wednesday, March 20, 2013


    Hand made see site below....beautiful work

    Photo: http://www.primitivearcher.com/smf/index.php/topic,37510.0.html

    http://www.primitivearcher.com/smf/index.php/topic,37510.0.html

    Snow Shelter to Build

    quinzee-2.jpg
    http://boyslife.org/outdoors/outdoorarticles/2992/how-to-build-a-quinzee-snow-shelter/


    OUTDOORS

    How to build a quinzee snow shelter


    30 Votes

    A quinzee is a simple shelter made by hollowing out a big pile of snow. They can take several hours to build, but are an effective way to stay warm when camping in the winter. Here’s how to build one.
    quinzee-1.jpgBUILDING A QUINZEE
    Step 1: Shovel a pile of snow into a mound seven to eight feet high and big enough around to hold two people once it is hollowed out. Mix snow of different temperatures to cause it to harden, or “sinter.” Flip the snow over so it mixes when you pile it into a mound.
     
    quinzee-2.jpgStep 2: Shape the mound into a dome and allow it to sinter for about 90 minutes. Then begin to hollow out the mound.
    Dig a small entrance on the downhill side. Smooth out the walls and ceiling. The walls should be one to two feet thick. Poke measuring sticks through from the outside of the mound, so you will know to stop hollowing out the inside when you see the ends of the sticks. Hollow the shelter out from the top down.
     
    quinzee-3.jpgStep 3: Use the last foot of snow to make elevated snowbeds. Dig a narrow trench between the beds all the way to the ground. This allows cold air to flow down and out of the quinzee. Poke a small ventilation hole near the top of the dome.
     
    quinzee-4.jpgStep 4: Building a quinzee will make you sweat. Prevent hypothermia by changing into warm dry clothes after you finish building your shelter.
    Make sure you mark your entrance in case it gets covered with snow while you are away having fun. Keep a small shovel inside in case you need to dig your way out.
     
    WINTER CAMPING TIPS
    - If you have to visit the latrine in the middle of the night, eat a snack afterward to help warm up your body and get back to sleep. Don’t worry about keeping the snacks in your quinzee — when you camp in winter, you don’t have to worry about bears.
    - Jell-O gelatin mix makes a great hot drink. Store Jello-O powder in refillable backpacking tubes and add it to hot water. Try cherry Jell-O in instant hot chocolate!
    - Eat your meals from their packages. Vacuum-sealed meals and packages of oatmeal can be opened and used as “bowls.” If you don’t rip the top off completely, you’ll have only one piece of trash to dispose of.
    - Bury your water jugs in a snowdrift. The snow insulates the water and keeps it from freezing.


    Survival Method Chart


    'nough said......


    https://www.facebook.com/NorCalSurvivalSchool


    Tuesday, March 12, 2013

    Porta-Potty You CAN MAKE


    Porta- Potty You Can Make

    Our family camps. We use what we camp with for EMERGENCY EVACUATIONS as well.
    I have given the site where I purchased my bucket, seat & emzymes.

     What's here:
    Biodegradable T.P  (but the cheap stuff works just as well)
    Papertowel roll
    Sani-wipes
    Garbage bags to line pot
    http://beprepared.com/double-doodie-plus-bags-with-bio-gel.html I have used these all up camping! BUT
       they are better to use!
    Hand sanitizer bottle is under bags---sorry.


    http://beprepared.com/tote-able-toilet-seat-lid.html
    This site is where I got my bucket & toilet seat.


    A MUST!

    Friday, March 8, 2013

    Fishing Rod Storage Made Easy

    FISHING ROD STORAGE MADE EASY

    Roodepoort-20130130-00995.jpg

    Needed parts
    i) Length of 50mm PVC
    ii)some drywall screws
    iii)Hacksaw,5mm drill-bit,a drill and Phillips screwdriver


    1)Get a length of 50mm diameter PVC and cut it into 15cm pieces
    (Each rod needs 2 pieces )

    2)Drill a 5mm hole in the centre of one side of each PVC piece (this is where you pass the Phillips screwdriver through)

    3)Cut a 1cm wide slit down the side of the front PVC pieces (This makes it easy to add/remove the rods)

    4)Put the Phillips screwdriver through the hole you drilled and add a drywall screw on top of it and screw it through the side of the PVC and into the ceiling beam do the same for the front piece


    Jacojvv over on instructables has a GREAT IDEA here!Roodepoort-20130130-00994.jpg


    photo: Jacojvv
    http://www.instructables.com/id/PVC-ROD-Rack/

    Thursday, March 7, 2013

    BUG OUT or BUG IN, THAT IS THE QUESTION.


    Bugging In vs Bugging Out: Have you Planned for Both Options?

    Filed under Bug OutPreparedness   Posted by: 


    Guy Bugging Out


    One of the most commonly asked questions that I receive has to do with the topic of Bugging Out. While some of our readers have managed to escape the trappings of the big city, most of our readers still live in highly populated urban areas. These are often the people who want to know how to Bug Out into the Wilderness once the SHTF.

    Hold the crazy train, you want to do what?
    While bugging out is a real possibility that you may some day face, I would never advice anyone just bug out into the wilderness. For even the most diehard outdoorsman, living in the wilderness full-time is something that most of us would never advise doing.  In my opinion, you’re setting yourself up for disaster, and it’s not a realistic survival plan that anyone should have in mind.
    Wilderness
    Bugging Out without a Place to go is Not a Plan, It’s a Death Sentence!
    In the event you ever have to get the hell out of dodge, you must have a plan of action. I hear way too many people saying they are going to “head out into the wilderness” once the SHTF; sadly most of these people haven’t spent a single night outdoors, and likely won’t last longer than 24 hours in a wilderness survival situation.

    Are you saying there’s never a good reason to Bug Out?
    Not at all; in fact, I think the people who swear they will “shelter in place no matter what”, are just as foolish as those who think they are going to live out some sort of extended episode of Survivorman.

    The Pros & Cons of Bugging In vs Bugging Out
    All too often I see people get hung up on the notion of bugging out. Many people foolishly put themselves into one of two categories, those that believe bugging out is the only answer, and those that say sheltering in place is the only way to go.
    In my opinion, you must be prepared for, and thoroughly understand the pros and cons of both options.

    Bugging out considerations: When Getting Out of Dodge is your only option.
    The moment you decide to bug out, you must realize that you put yourself at immediate risk.  Your safety and security, your ability to sustain yourself, and your ability to protect yourself from the elements are immediately compromised.
    In my opinion, bugging out is almost always a worst case scenario situation. In order to do it right you must have:
    • A detailed evacuation plan and you must know it like the back of your hand. This means constantly reviewing your route, practicing your get away, and knowing what things need to happen before you make the decision to bug out.
    • A bug out location: Leaving without a place to go is not a plan. If you plan on bugging out, you need to have a predetermined bug out location or emergency shelter already in place. Planning on living in the wild, unless you are an extremely experienced outdoorsman, is a recipe for disaster. Wilderness living should only be considered if you have an adequate shelter already in place.
    • A bug out bag filled with everything you need to make it to your Bug Out Location.
    • You must know your routes, and you need to have a plan B, C, D, etc.. What if you’re route s blocked or impassable? Do you know how to find food and water along your route? These are all thing you need to consider and plan for now.

    Bugging in considerations: Staying safe by sheltering in place:
    If at all possible, sheltering in place is usually the safest option. First, most of your supplies are probably going to be at your primary residence. Second, in most cases you will have a higher level of security inside your home than you will traveling out on the street.
    While sheltering in place is often the safest bet, there are some considerations that you need to keep in mind.
    • You must always be prepared to leave. No matter how bad you want to stay, there will be times andsituations that make it impossible to stay. If a category 5 hurricane is barreling towards your location, the last thing you want to do is shelter in place.
    • Home security needs to be a top priority. The ability to defend your home, from those that wish to do you harm, is one of the most important considerations that you need to prepare for. From Realistic Self Defense Training, to fortifying your home, you must make home security a top priority.
    • Neighbors may come knocking. During a SHTF situation, your not so prepared neighbors are going to be in panic mode. While most of these people might not pose an immediate threat, if things get bad enough those once nice neighbors will quickly become unpredictable. You must have a plan to deal with those that failed to prepare.
    • If you live in a high density population center, you immediately put yourself in danger and make your chances of survival lower than if you lived in a rural area. While I’m not saying bugging in won’t work in an urban setting, it will become increasingly harder as the severity of the disaster increases. If you live in one of these urban areas, you need to seriously access your situation and understand the dangers associated with urban survival.

    COMMENTS TO  ARTICLE:

    Mike says:
    Bugging-In versus Bugging-Out decisions both have their advantages and disadvantages.
    By electing to stay, (BUG-IN)  you continue to have your same level of security and supplies… for a while. The more people within your ‘bug-in’ group the better for security. If you have a good relationship with neighbors around you can also improve your longevity; at least until conditions are approaching the ‘grave’ side of the spectrum for any member of your collective group.
    You could ‘stay’ too long and conditions would no longer allow you to escape:
    Official ‘road-blocks’ have time to be placed between you and your intended BOL;
    Stranded vehicles block passage of the main roads forcing you to continue on foot (that includes bicycles and carts);
    Alternate routes may take you through neighborhoods that have established their own local militia also prohibiting your passage;
    You have depleted all your resources.
    If you elect to leave, (BUG-OUT)  you need to consider all of ‘your’ options and obstacles. Being alone or just you and your significant other is easier to make a decision than if you have kids or parents that you care for.
    Alone, your security becomes your biggest threat since you must sleep sometime.
    Sound discipline is crucial when traveling with children if you wish to remain stealthy.
    While carrying ‘everything including the kitchen sink’ may sound nice, your back and knees will probably give in before your mindset; you need to test your equipment and eliminate most of the ‘luxury’ or ‘comfort’ items.
    In my mind, fortifying the home front is the first step. I live close to one of the few exits from my area and can observe the flow of any exodus. Being close to an exit increases the need for security as people leaving start to look at your place as that ‘last gas for 200 miles’ facility. On the other hand, being that close to an exit may allow you to get out ahead of the crowd.
    Our early pioneers would gather at an exit point, i.e. Saint Louis, and create a wagon train with groups of families. I believe a bug-out situation would be similar where your extended family, so it may become, head out on a selected route with multiple vehicles; a scout vehicle out front with the main convoy and rear guard following. Having two-way radios would be a huge advantage.
    We have already committed to the fact, that if we must bug-out, it will be a condition where coming back may not be a possibility so we bring what we can. We test our gear and skills in all seasons. We believe we are as ready as we can be, while still refining plans.
    The scary part in my mind is the actual decision to leave; what if you leave too soon and it turns out to be a false alarm… your job may not be there when you come back. If it was not a false alarm, who cares about your job!
    What if you wait too long and get stopped by ‘official’ roadblocks then shuffled off in masses to the local FEMA farm?
    What are you going to do if there are squatters at your BOL? They don’t care if it is your property or not… haven’t you heard “Possession is 9/10 of the law”
    Regardless of your decision to stay or go, if it comes to that ultimate decision it will certainly be scary times for more people than just you… and the Darwin / Spencer saying “Survival of the fittest” becomes reality.


    Prepare in Suburban Setting


    THIS IS A GREAT ARTICLE. SITE AT END OF ARTICLE. 


    How Safe is Your Family? 9 Rules for Suburban Preppers

    How Safe is Your Family
    Photo by Eric Ward via Wikimedia Commons
    Some families and individuals living in a suburban area may feel they cannot properly prepare for a disaster because they do not have acres of land, or even a safe haven some miles from the city. Some may even feel trapped. Although there are, certain disadvantages to living in an urban environment if disaster strikes the disadvantages would not be considered life threatening. There are however, rules for prepping if you live in suburbia, rules that will ensure you can survive a disaster. The rules generally speaking, are not disaster specific but it will be noted when one is specifically for a certain crisis, otherwise assume you would follow the general guidelines regardless of the catastrophe.
    Rule Number 1
    From a security standpoint do not divulge how well prepared you are to anyone but your immediate family
    This rule will cause some debate because people generally want to include others in their lives for various reasons but there are certain things you must keep to yourself. Some preppers have meetings where everyone lays out their plans and discusses techniques, what they have stockpiled and what they need. This is a learning process for many of those new to prepping and frankly many people new to prepping do not have their heart in it. They may feel it is a fad, or the thing to do because their friends pressured them and so on. In other words, they are not really preparing, but just going through the motions. People just naturally assume that bad things happen to other people. They will not get the message until it is too late. It is very difficult for some people to understand that the biggest enemy during a crisis is other human beings. A young couple with small children will do whatever it takes to provide for their children, and this includes taking from you. Never underestimate desperate parents.
    It is not this article’s intent to discourage networking with other preppers but to emphasis the need for security. Trusted friends and allies are essential to survival but it is important for you to realize that when disaster does strike you may only have yourself and family to rely on. Just be careful about advertising how well prepared you really are. Telling everyone, you have silver and gold buried for bartering is only inviting trouble. Your friends may not pose any risks, but they will drop a comment here and there or their children will and soon everyone knows where to find resources during a crisis.
    Rule Number 2
    Prepare for the threats that are most likely to happen
    Nuclear, chemical or biological attacks are a very real possibility in large metropolitan areas. If you cannot flee the area you will need duct tape and plastic to seal your home from the outside air, but not to the point where you suffocate yourself. Having a basement is ideal where you can get below ground level. You want to put as many obstacles between you and the blast or dispersal area as possible. Attacks of this type may very well come without warning, so make sure you have ample tape and plastic and even protective suits if that is economically feasible.
    Rule Number 3
    Do not stockpile your supplies in one place
    Cache supplies in various underground locations in your yard or even in some outbuildings. If you are robbed or your home is damaged you can lose all of your supplies. You will need backup resources. Do not cache supplies in commercial storage facilities. You may not be able to retrieve your supplies during a crisis and commercial buildings are prime targets for looters especially self-storage buildings.
    Rule Number 4
    Prepare an evacuation plan
    Do not convince yourself that you will never have to evacuate because you will not be able to if you have not prepared. Evacuation is a very real possibility. There may be extensive damage to your home or there are air borne contaminates or nuclear fallout in the area, which means you, must leave. Make sure you have the means to transport your supplies even it if it is just backpacks. You cannot leave empty handed.
    Rule Number 5
    Stayed informed
    Information is crucial before, during and after disaster strikes. So make sure you have the equipment to stay informed such as ham radios, Citizen band Radios (CB) and even two-way radios. You want to be able to monitor traffic from emergency responders and ham radio operators. Ham radios are used during disasters to rely information nation and even worldwide in some cases. Ham radios have extended ranges. Be careful about using the radios for other than monitoring because if you are transmitting, your location can be determined by triangulation of the radio signal. If you are in a situation where you have to evade others do not transmit but simply monitor your communication devices.
    Rule Number 6
    Do not wait for your local government to help you
    Depending on the magnitude of the crisis, your local and even the federal government will go into self-preservation mode and it can be weeks or even longer before they will be of any help.
    Rule Number 7
    Avoid getting caught up in protest or demonstrations
    Society in the short term will go through some changes during a crisis and yet overall it will remain the same. You will find that after just a few days some people will be demanding changes from their leaders and some may even begin marching and protesting. This is counterproductive; your time needs to be spent surviving and planning for long-term sustainability in the event the crisis is for an extended period. There will be plenty of time for complaining and affixing blame later.
    Rule Number 8
    Plan for home defense
    Every occupied home will be a target as well as unoccupied ones during a disaster. Most serious preppers would probably consider home security a number one priority and it is a priority, but getting a bunker or siege mentality is not beneficial. You cannot barricade yourself in your home to the point you have created a death trap if there is a fire or someone does break in and the intruder is between you and the exit. You do need to have a plan, a common sense approach to home defense that includes an escape plan. Consider firearms, and having the tools and materials such as plywood sheets on hand to secure windows and any glass openings.
    Remember your biggest threat is other humans in the community and not the government. If you believe an army will show up to take over your home and confiscate your possessions there is simply not enough firepower you can amass that would stop them, so planning for that type of invasion is futile.
    You are protecting your home from looters and others living in your city and not from some shadow government waiting on a crisis so they can march into your town. You will also be defending your family and possessions from neighbors that have turned to violence in the name of providing for their families.
    Rule Number 9
    It is never been a matter of if but simply a matter of when
    A crisis will strike and in all likelihood, it will be the one you least expected. However, as stated earlier supplies, tools and materials are not necessarily disaster specific. Always prepare with shelter, water, fire/energy and food as your priorities because you cannot survive any crisis without them. Once the priorities are met then you can get more specific in your planning.
    Considerations and Obstacles Facing Preppers Living in Suburbia
    Living in a suburban area means you probably do not have space for a sizable gardenso developing a sustainable food source would be difficult. However, you can grow virtually any vegetable using hydroponics, which is growing foods without using soil as a growing medium.
    Because you cannot rely on your environment to provide you with a food or water source in the early stages you will need a substantial amount of food and water. If you lived in a rural area you would have rivers, streams and lakes and land for growing foods and you could hunt and fish to supplement your food supplies.
    Proximity to other people is a disadvantage in urban areas. Friends’, neighbors and strangers can pose a risk to you and your family. The risks increase the longer the crisis goes on.
    Having to commute to work and schools may mean you are more exposed to the crisis. You may be at work when disaster strikes so additional planning is required. You will need to have rendezvous points for family members if an attack happens during the school and workday. Ensure you know what the emergency plans are at your children’s schools. Are there areas where the children would be at other than at the school during a crisis, emergency shelters and so forth?
    Carry an emergency survival bag in all of your vehicles with several days’ worth of food and water for you and your children. If an attack comes while you are at work and you rush to pick up your children at school you may be delayed because of the crisis and you have to be prepared to shelter in your vehicle until you can make it home. Make sure everyone is aware of this contingency plan.
    PREP NOW AND PREP HARD!
    -SP

    http://www.suburbanprepper.com/how-safe-is-your-family-9-rules-for-suburban-preppers/

    Wednesday, March 6, 2013

    Solar USB Charger & Weatherband Radio


    Etón Raptor NSP200WXGR Solar USB Charger and Weatherband Radio


    http://www.amazon.com/gp/product/B004H8FUEC?ie=UTF8&camp=1789&creativeASIN=B004H8FUEC&linkCode=xm2&tag=survivalismfb-20

    Friday, March 1, 2013

    Cooking Off The Grid Without Power

    Cooking Off The Grid For Emergencies or Fun


    Camp Chef - We own this, well ours is REALLY USED.

    Where there is NO KITCHEN cooking. Maybe the gas, electric is off due to emergency? CAN YOU STILL COOK?

    Hey, don't panic if your microwave won't cook. YOU can do this.

    Even if you have MRE's stored they do need heated. Yes, I know they come w/ their own heating device. BUT, that's NO fun (we did this on a dry run) when you have little ones (your children or grandchildren want to EAT NOW).

    Here's simple planning and participation with photos so you can COOK.


    We call this OFF-The-GRID cooking. Outside is best, if the weather allows. If not BE CAREFUL cooking inside with gas or fire. VENTILATION  VENTILATION & I still DO NO recommend doing this cooking inside for your health and safety. (Fumes - Toxic !)

    Camping stoves – These are wonderful for short-term emergency. Remember to have fuel in your storage for this stove. IF you forget to have extra fuel, these are just metal sitting. Any size stove will work we have the CAMP CHEF and just love this thing. We take it camping and use it in the yard. The smaller stoves are good but not for cooking larger meals. They do well for single portions and again, remember to keep extra fuel. I have enough fuel for 1 week of cooking 3 warm meals a day.


    Camp Chef photo credit


    Backyard Grill – This is my personal first line of defense if the power goes out. It is simple to use and already set up outside. The main drawback is the need for propane but I keep an extra 50lb. canister of propane at all times so that if my main source runs out I still have a spare. This spare propane would be on my list of basic household items that you need to stock up on also. Some people use charcoal so an extra bag or two would be wise. It won’t last as long as a can of propane but having the ability to cook for a few days is always a smart idea. Optionally, if your house is heated with propane, you can purchase an adapter to run your grill but you probably are already using your oven in the house. It’s nice to have options.


    Campfire –  Do you have a FIRE PIT in your yard?  This is also a good option to use w/ the Camp Chef gas cooking (make the propane last longer).  It's good for things that need to cook longer. Make sure you have rocks to contain fire.  Invest in @ least one CAST IRON COOKWARE. One that you can fry or cook stew.  Also it's nice if you have a tripod method to SUSPEND YOUR cookware over the flames.


    Tripod Cooking


     The grilling grate is easier to use a skillet.


    You might recognize this type cooking ring from the Forest Service. They are also excellent in your yard.
    Just make sure you don't wait until you have an emergency to purchase this item. I like the idea of using gravel all around the fire ring.

    You can use the grill grating itself over a regular campfire so don’t throw that away. IF you have a grill that dies KEEP the grate! It's good to have an extra. We use both of our grates on a larger fire. We got them from old gas grills, we found at yard-sales. (Reduce-Reuse-Recycle).


    Rocket Stove – Rocket stoves are simple to build using materials you may have lying around or in the shed. These can be fueled with sticks and twigs and make a great surface that produces a lot of heat without a big footprint.

    Rocket Stove | Patriots, Politics, Prophecy and Preparations: photo credit


    photo credit:  http://rocketstoves.org/

    Make this Rocket Stove out of #10 Cans.


    Block Of Wood -
     

    I have seen this on the internet alot lately. But, this is for meal in a skillet method. It will stain your cement  if that matters. I'm not a fan of this type cooking, make sure all the FIRE COALS are OUT w/ sand & water.
    EMERGENCY cooking means you may already be short or NEED all the water you have.

    Dutch Oven Cooking - This is my favorite.  Below is a few things you will need.

    The BASICS.....


    http://camping.lovetoknow.com/Slideshow:Hiking_Camping_Tips PHOTO CREDIT


    This is what I use normally - a garbage can lid.
    Dutch Oven Cooking / Dream Adventures photo credit

    Stacking Dutch Oven's works great but I've never done it on a table.


    Open pits like this are in most backyards. LOOK what they can do.


    Stacking Dutch Ovens.


    Volcano is option for Dutch Oven Cooking. 

    The options of Dutch Oven Cooking are just endless.


    http://www.smokingmeatforums.com/t/108006/some-pulled-pork-fajitas

    This wok is used with gas.


    THIS it the type wok I use over an open it. I love wok cooking. 

    Lanterns – Anything that produces heat can warm your food and some lanterns give you the ability to use the heat escaping from the top to boil water or heat soup. This is yet another good option that may work for some people. Candles can also be used but this would be my last resort. They take forever but you are already using your candle so this is a way to get two uses out of your preparations.

    Solar – I saved this one for last but solar cooking shouldn't be discounted at all. If you have sun and dry weather this is a great way to heat up and cook meals if you have time to wait. You will want to build your own solar oven which is fairly simple or there are several you can buy online. If you just need to warm up a can of soup you can sit that in the sun on the driveway for 30 minutes and voila!
    Solar ovens can be made in numerous ways with lots of material.


    I haven't ever had good luck with solar cooking. I don't have the patience. BUT, it is an option my hubby has done in scout camp.

    Wood stoves – For those blessed enough to have one, you will of course know how to use it.  Some people have wood stoves outside for summer cooking.

    Tuesday, February 26, 2013

    Dryer Lint For Great Fires


     “Can dryer lint be used as a tinder? If so, how? How is it like Char Cloth?”

    Comment #1: Take a bit of dryer lint put it in an ice tray and pour wax over it, let dry. Easy cheap.
    Comment #2: Yes……I also carry Petroleum Jelly…….a bit of that on the Lint Ball hugely extends burn times…
    Comment #3: Also, as a Boy Scout I learned that you can scrape material (lint) from your jeans with a sharp knife for tinder in an emergency.
    Comment #4: When you see how easy that lint catches a spark you will be scared to run your dryer.
    Comment #5: It is very flammable. I save mine all year. A small pinch and a spark will poof. It can also be used to start fresh wood over coals. Other people use it with a paraffin mix by melting the wax, stirring in the lint, then letting it harden in small molds (mini muffin trays lined with paper cups work great). You can add a wick to those for handy fire starters.
    Comment #6: Take a toilet paper roll. pack it full of dryer lint. Melt Petroleum jelly in the microwave and pour it into the lint in the tube. carefully cut this into rounds. dip rounds into wax to protect. TO use scrape off wax to expose jellied lint, strike a spark into it and nurse your fire. But Charcloth is the single best thing I know of to coax a spark into flame.
    Comment #7: I love using drier lint in toilet paper rolls, we never throw ours away. I have pals in both bathrooms for the empty rolls and one on the drier for lint and used drier sheets. Another handy way is to take cardboard egg cartons, pine cones, wax or perifin set lint in bottom of egg cups then place pine cones on top pour enough wax to cover bottom of the cone. Then tear off a cup whenever you need one. Be careful stuff burns better than cow chips.
      THANKS TO THE SITE BELOW FOR THIS POSTING.
     http://campingsurvivalblog.com/wilderness-survival-tips/can-dryer-lint-be-used-as-a-tinder/